
Purpose
To outline the usage of the generate barcodes function
Covers: Generating barcode labels
Does not cover: Creating new label style, printing borrower barcodes
Instructions
Generate Barcode Settings
Barcodes can be generated and printed onto sticky labels using the generate barcodes feature. These are primarily intended for books and other resources.
If you wish to print out barcodes for your borrowers, Card Print should be used.
Get the most out of Reading Cloud with our flexible training packages delivered at a level and pace that suits your needs. Find out more.
To access the generate barcode labels function, load the Management page and ensure you are in the Resource table, and select 'Modules' from the menu bar at the top of the page, next select 'Labels...' from the menu that appears and then 'Generate Barcodes...'.
In the 'From' box, enter the number you wish the generated labels to start from.
In the 'Pages' box, enter the number of pages you wish to print.
In the 'Style' box, select the style of labels you wish to print the barcodes onto. This needs to match the physical labels you have.
The 'Unused Numbers Only' tick box is used when reusing the barcodes of books you have removed from your library system. To do this, tick the box and ensure that a low number (even '1') is entered into the 'From' box.
To include the school name on the label, tick the 'Include School Name' option.
Custom Settings
To apply custom formatting to your barcodes such as a leading character, select the 'Configure...' button to load the 'Configure Labels' settings box.
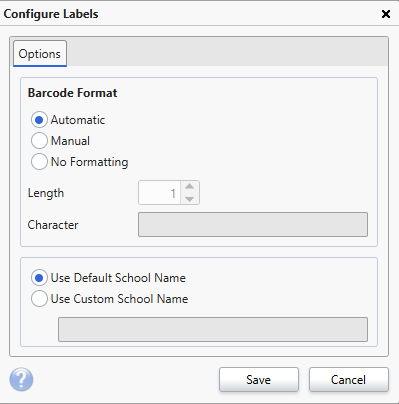
Under the 'Barcode Format' heading, select one of the radio buttons to apply this setting to your barcodes.
'Automatic' will apply the default formatting options as defined in the automatic borrower & resource sections.
'Manual' allows you to specify the length of the barcodes and a character to prefix the barcodes with. When this option is selected the 'Length' and 'Character' options become available. If you are using a leading character on the barcodes, we recommend you use an uppercase letter. Increasing the length will add leading 0's to your barcode to pad it to the specified length (Selecting a length of 5 would make barcode 12 become 00012). Please be aware a leading character is not taken into account when assigning the length (If you specify a length of 5 and add a leading character of B, the barcode number 12 would become B00012).
'No Formatting' does just that, select this option to apply no formatting to the barcode numbers.
If you ticked 'Include School Name' on the previous screen, select 'Use Default School Name' to include the school name from your license or click 'Use Custom School Name' to specify one in the available text box.
To apply the selected settings, click 'Save' to return to the previous box. Note that these settings are only applied on this specific generation of labels, they will revert to the default on the next run.
Click 'Generate' and a PDF of your newly generated labels will be presented on screen. If you wish to print these labels onto the physical blank sticky labels you can send the labels to the printer.
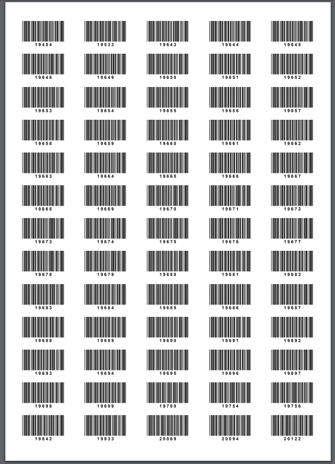
The standard label style uses Avery - Mini Laser Labels (L7651). These are A4 sheets with 65 labels, they will appear in the layout shown below. Should you wish to utilise another type of label, you will need to create a new label style.
When generating a large number of labels you may be presented with a warning message. The completed document will also be available in the output table after a short wait. From there, it can be downloaded or printed.
You may receive a message like the below. If so, please wait a few minutes and then check the output table.

If the document still does not appear, then please try generating again but select a smaller number of pages.
'Generate Barcodes..' option is not available
If the option is greyed out, please ensure you are on the Resource table. The generate barcodes function is not available on other tables.
FAQs
Q: I've clicked generate, but nothing has appeared?
A: Any labels generated should appear automatically. If they do not, you may have a pop-up blocker or some filtering enabled. Any items generated can be found in the Output table.
Q: I've generated and tried to print the labels, but they aren't aligning to the labels correctly?
A: Please ensure that you have selected the correct alignment settings before printing.
How some of our other customers have phrased this
- Create new barcode labels
- Generate new barcode numbers
- How to create new book labels
- How do I print out new barcode labels?
- How do I get more bar codes?