
Tip: Streamline your student data management with Intake. Find out more here.
Purpose
To provide instruction on the transfer process for adding new students to the Borrowers table, after they have been imported to the Intake table.
Covers: Transferring records from Intake.
This section does not cover: Exporting or importing a CSV.
When to Do This
After records are imported (either via automatic sync or CSV), before assigning borrower login credentials.
Instructions
It's essential to check that all records in the Intake table are new borrowers before transferring them. If a CSV file has been imported to update existing borrowers then they will not show in Intake after importing a CSV, the changes are immediate. If borrowers in the Intake table are already in the library system and are transferred, duplicate borrowers will be created.
If there are borrowers in the Intake table that are already in the Borrowers table, they need to be manually matched before new borrowers are transferred.
Open the 'Intake' table from the 'Database' menu at the top of Management.
From here, you will be able to see whether this table is empty or contains your new pupils. The record count at the top right corner of the screen also shows whether there are any records present.
If you have borrower data within the Intake table, please check if matching has taken place.
If you are expecting borrower data to be present in the Intake table but there is none, this could be one of a few reasons.
Click the 'Transfer' icon on the right-hand side from under the 'Records' menu.
To make the barcode allocation process easier, the system has two options to choose from: Automatic or Management ID.
Automatic
Selecting this option means that the system will automatically generate barcode numbers for each record when transferring them to the Borrowers table. It is possible to specify the automatic barcode settings for borrowers that are used when transferring from Intake.
Management ID
The Management ID is a unique number assigned to each pupil in the school management system. When choosing Management ID, the application will set the borrower barcode to this number when they are transferred.
How to Check if You Used Automatic or Management ID Previously
Log into your library site.
Click 'Manage Library' or 'Librarian Only'.
Click 'Borrowers' on the left-hand menu.
Click a borrower and click 'Edit' on the right-hand menu.
Click 'Advanced' tab, check whether the 'Management ID' is the same as the 'Barcode' number.
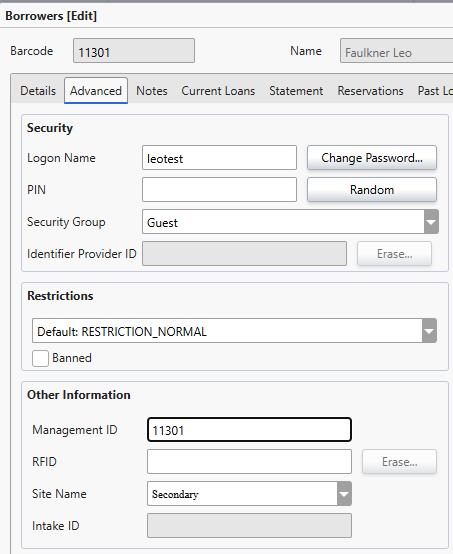
If the 'Management ID' matches the 'Barcode' number it appears that the 'Management ID' transfer option has been used previously. In the event that they do not, it is likely that 'Automatic' has been chosen.
How some of our other customers have phrased this
- What do I do after importing a CSV?
- Where are my new students?
- Students are not in borrowers table after import.
- What do I do with records in the Intake table?
- Do I transfer with management ID or automatic?
Need Some Extra Help
If you are struggling with an issue please let the friendly Reading Cloud Service Team help. If you are using the chat bot and your issue is urgent, just say “Transfer for help please”. Alternatively if you prefer you can email them with support@reading-cloud.com or give them a call on +44 (0) 330 822 5359.